Wildfire Ref - Sectors
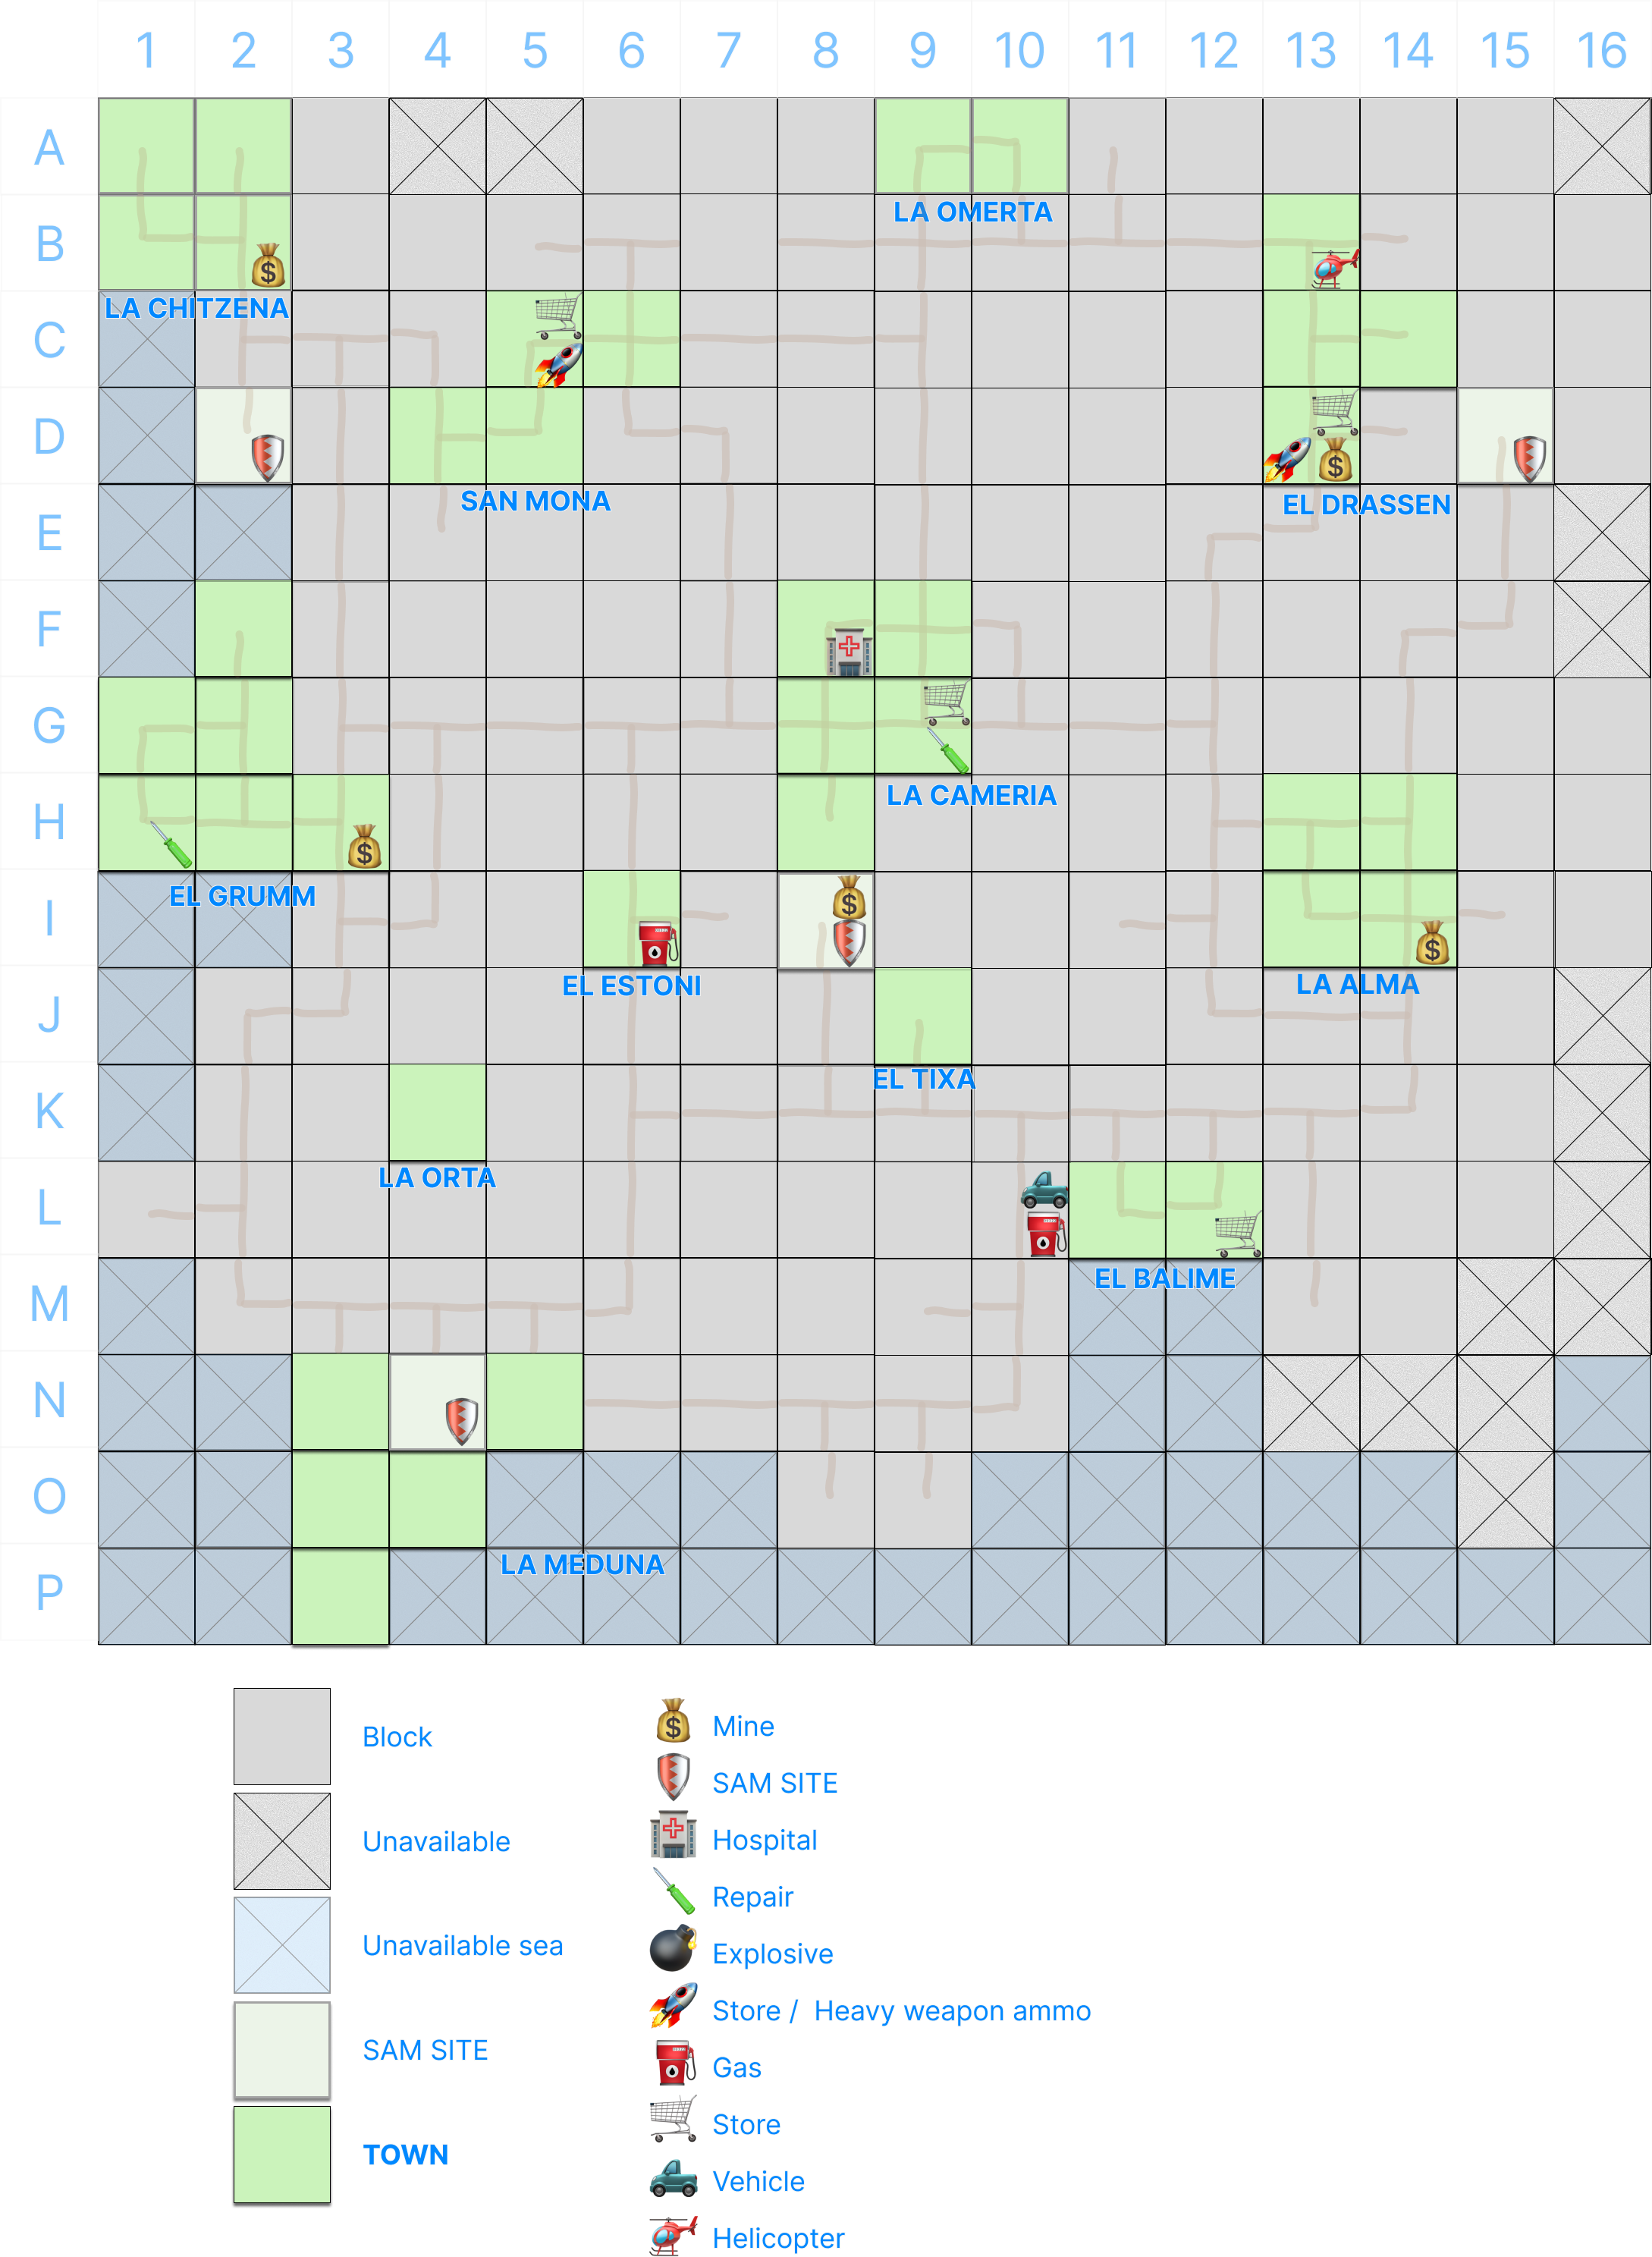
Sector description sample
Sector(s): B13 C13 D13
Size: 4
Main facilities: Airport
Control: -%
Loyalty: -%
Associated mine: D13
Controlled: yes
Militia: -(-/-/-)
Civilian training: -%
Enemy forces: -
`#` of items: -
Sector D13 description sample:
EL DRASSEN MINE

Sector: D13
Status: running out / producing
Daily production: $9,600
Possible production: $15,000
Production rate: 64%
Town control: 100%
Town loyalty: 64%
Ore type: silver
controlled: yes
Militia: 24 (7/15/2)
Civilian training: 81%
Enemy forces 0
`#` of items: 7
Randomly NPCs
NPCs that appear randomly in the sectors
Carmen : A terrorist bounty hunter.
- Sectors: C5 bar, C13 bar
Micky : A animal parts dealer.
- Sectors: C5 bar, D13 Bar
- His daily trade limit is $4,000.
Devin : A explosives dealer, a recruitable NPC, $800 per day.
- Sectors: C5 bar, D13 bar
Father : A church priest.
- Sectors: C13 bar (afternoon) / church (morning), D13 bar (afternoon)
- Have Ira speak to him to complete the mission: the Rebels need food from Drassen. This will increase Omerta's loyalty.
- If you buy him alcohol, he will reveal that 'Queen Deidranna has a use for dead bodies' after getting drunk.
Joe | Tiffany Eddie: One of 6 terrorists.
- Sectors: C6 Bar, H14 middle-right
- Items: Colt Commando, 5.56mm magazine, $900
Terry | Richard "Slay" Ruttwen: One of 6 terrorists, a recruitable NPC for one week only.
- Sectors: A2 upper-right corner, G8 lower-right corner
- Items: Steel Helmet, Kevlar Vest、M14、7.62mm NATO 20, $800
Annie | "Matron of Mayhem": One of 6 terrorists.
- Sectors: I14 lower-middle corner
- Items: G3, Tear Gas, Mustard gas, 7.62mm NATO 20, $300
Jasmin "T-Rex" Rexall: One of 6 terrorists.
- Sectors: F9 upper-right corner
- Items: Spectra Vest, MAC-10 x2, .45 SMG Magazine AP, $400
Chris | Kris Carver | The Imposter: One of 6 terrorists.
Mike: The Queen's army trainer and military advisor.
- Sectors: L11, G12 Plains, road
- Items: SVU, Spectra Pants, 7.62x54mm 10 AP, Hand Grenade, Mustard Gas, Gas Mask, $4,000
Hamous : The Ice Cream Truck owner, a recruitable NPC, $250 per day.
- Sectors: C3, D9
Skyrider : A helicopter pilot.
- Sectors: D12, B15
- He will agree to serve you after you escort him back to the helicopter in sector B13.
NPCs that appear randomly in the sectors (sci-fi)
- Gabby: A Crepitus Elixir dealer.
- Sectors: H1
San Mona
The C5, D5 and C6 sectors are neutral, both Deidranna soldier and your militia are not allow deploy here.
NOTICE:
- All San Mona NPCs will become hostile if:
- you attack in any of the M2, M3, M4, M5, N6 or La Meduna sectors
- hurt injure any NPCs in San Mona
- pry open cabinets in front of NPCs and steal their items in San Mona
D4 San Mona Mine
Enemies: ~9
Items:
- Gas Mask
- Kevlar Vest
- Walkman
- Remote Trigger
- HMX
- C1
- TNT
- Remote Detonator
- Detonator
- Wire Cutters
- Porn
- Break Lights
- Gas
- 1st Aid Kit
- SPAS-15 (with Duckbill, Sniper Scope)
- 12 Gauge BS
C5 San Mona
Brenda : A customer at an XXX store annoys Hans, you can give her a porn video or kill her to make her disappear, and Hans will introduce Tony as a thank you.
Hans : The XXX Stuff store owner.
- He will introduce Tony after you solve Brenda.
Tony : The best firearm dealer in the game.
- He sometimes step out for 1-15 days.
- His daily trade limit is $15,000.
- Tip(s) :
- To tarde with him 24/7, you must blow up the wall of the room next to him using a C1 explosive.
Iggy : A heavy-weapon expert, a recruitable NPC, $2,000 per day.
- He will show up in the bar after you control at least 5 sectors (excluding Omerta and San Mona).
Madame : The owner and manager of the Shady Lady brothel.
- Kingpin had a particular fondness for a girl Maria from the brothel. Madame and Kingpin maintained a very good business relationship.
- If you send a male mercenary to talk with Madame, she will recommend a prostitute named Bambi, located in the far right corner, for $300.
Billy : He is Madame's bodyguard, and royal only to her.
Joey : A kid who run away from his home in sector G8.
- If you threaten him multiple times, he will eventually agree to let you escort him back home.
- It's interesting this underage 15 years old boy plays around the wall near the brothel ...
Maria : Angel's younger sister.
- She was taken away from her brother and forced to work as prostitute for a year.
Frank : A bartender.
- He knows Carmen's location.
- There is $1,500 cash in the desk of the room behind him.
Kyle : A gay man and the owner of Tattoos store.
- He dreams of leather shop.
- After you rescue Maria from the brothel, her brother Angel will give you a deed to the leather shop as thanks. Kyle is happy to trade the deed for $8,640.
C6 San Mona
There are many valuable items in the two repositories located in the upper-right corner of the map.
Alberto : A bar owner and one of the five Santos Brothers.
Angel : The Skin Tyte store owner.
- Speak to he get information about rescuing his younger sister from brothel.
- After a successful rescue, he will show his appreciation:
- He is willing to sell you a nice Kevlar Leather Jacket with bulletproof features for $950, or give you for free if you refuse to buy.
- He will give your the deed to the leather shop .
- He will tell you Kingpin hides a large of cash in an abandon mine.
D5 San Mona
Spike : The Boxing Club's security and a member of Kingpin's mob.
- There are two ways get into the club:
- Send a mercenary with LDR higher than 45, and Spike will let you in.
- Unlock the backdoor of the club using a mercenary lockpicking skill.
Damon : Kingpin's private bodyguard.
Carlo : A bar owner and one of the five Santos Brothers.
Darren : The Boxing Club night manager and deputy mayor of San Mona.
- He works for, and is loyal to Kingpin.
- Appears in the club between 18:00 and 23:00.
- Boxing rules:
- Fighters cannot use any weapons except Marbles and Knuckle Dusters.
- Up to 3 rounds take place each night.
- Each round accepts bets from $1,000 to $5,000.
- Throw Marbles on ground before Darren's fighter gets on stage. The fighter will fall into coma after the match starts, guaranteeing your victory.
- Kingpin will invite you to his house as a guest after you win three times.
Kingpin : Mob boss and San Mona's de facto sovereign.
- He is willing to reward $20,000 for the Chalice of Chance stolen from the L12 museum.
- Most named NPCs in San Mona are loyal to him, they (Billy, Madame, Frank, Hans, Tony, Kyle) will turn into hostile toward you if you kill him.
- He hides $30,000 in cash plus silver worth about $4,235 in an abandoned mine.
- You can reach it by bombing the wall of the repository next to his house.
- If you steal his money, all San Mona named NPCs will warn you. You must return the money plus interest (125%, totaling $33,750) within 48 hours, or he will send assassins to hunt you across the entire Arulco.
- There is also $15,000 cash in his office.
EL Estoni
I6 EL Estoni
Maddog : A lock-picking expert, a recruitable NPC, and son of Jake.
- Items:
- CAWS
- CAWS Magazine, Buckshot
- Tool Kit
- $20
- Locksmith Kit
- Gas
- Crowbar
- Wire Cutters
Jake : A Second-hand goods merchant 24/7, friend of Shank, and father of Maddog.
- Let Shank talk to him, he is willing to sell 6 barrels of gas per day, and Skyrider can use this sector as a helipad.
Skipper : A homeless man. Buy him a Walkman from Jake, and he'll give you an electronic keycard to the Orta basement gate.
La Omerta
A9 La Omerta
Enemies: 7-15
Items:
- M870
- 12 Gauge
- 12 Gauge BS
- Flak Jacket
Pacos : Fatima's young son, plays around Fatima's house.
Fatima : Pacos's mother, a rebel soldier relative. Give Enrico's letter to her, she will lead you to A10 to meet Dimitri, Dimitri will guide you to A10-1 (Rebel Hideout) to meet Miguel.
A10 La Omerta
Dimitri : A member of the rebel force, a recruitable NPC, $0 per day.
- Go back to hideout and recruit him after you recruited Ira.
A10-1 Rebel Hideout
Ira : A member of the rebel force, a recruitable NPC, $0 per day.
- You could recruit her after you met Miguel.
Miguel : Leader of the rebel force, a recruitable NPC, $0 per day.
- Take control of 2 towns(5 towns if playing on expert difficulty) at least, then return to recruit him.
- Rebels need food from Drassen (requires Ira to speak with the Father).
Carlos : A member of the rebel force, a recruitable NPC, $0 per day.
- He follows Miguel, and you can recruit him after recruiting Miguel.
Items:
- Break Light
- Throwing Knife
- Batteries
- Wire Cutters
- Canteen
- Locksmith Kit
- Sun Goggles
- Gas Mask
- Crowbar
EL Drassen
Main facilities: airport
B13 Drassen Airport
Tip(s) :
- Attach and control the roof of central building as soon as possible, it is the best attack and defense point.
Enemies: ~30
- recap: ~6
Pablo : The airport repository keeper.
- He sometimes steals goods from your shipments. Bride him with $100 regularly to prevent this.
- If you kill Pablo, Sal will appear, Sal is even greedier than Pablo.
Waldo : An airport mechanic.
- Speak to him to get information about Skyrider's location.
C13 EL Drassen
Enemies: ~25
Doreen : A clothing factory owner.
- She hire children for work in the factory. If you threaten and pressure her to dismiss the workers and leave, Drassen's loyal will increase.
Herve : A bar owner and one of the five Santos Brothers.
D13 Drassen Mine
Enemies: ~30
Items:
- C1
- C4
- HMX
- TNT
- RDX
- Detonator
- Remote Detonator
- AKM
- LAW
- all kind of Grenades
Fred : The head miner of Drassen.
- After you gain control of sector D13 and sector's loyalty is higher than 30% (expert level), speak to him to begin receiving daily income from the mine.
Peter : A bar owner and one of the five Santos Brothers.
D15 Woods. SAM Site
SAM site(surface-to-air missile site).
Tip(s) :
- There are many mines scattered around the site, you must bring a Metal Detector to locate them safety.
- Bringing mercenaries with high MRK, Night Ops and Stealth skills will greatly increase your chances of a successful attack.
- After you gain control of this sector, Skyrider and the helicopter can deploy to ⅕ of Arulco at lower cost with improved safety.
Enemies: ~25
Items:
- Mortar
- LAW
- M79
- AKM
- M16
- USP
- Laser Scope
- RPK
- Extended Ear
- 9x39mm
- Hospital
- 1st Aid Kit
- Spectra Helmet
- Spectra Vest
- Spectra Pants
- Tool Kit
- Gas
La Alma
Main facilities: shooting range
Tip(s) :
- The best attack path is I14 → I13 → H13 → H14 instead.
I14 La Alma Mine
Enemies: ~30
Items:
- LAW rocket
- Porn
- Stun Grenade
- Hand Grenade
- Mini Grenade
- Mustard grenade
Auntie : One of the residents of Alma who complains of local marauding Blood-cats.
- Speak to her receive information about clearing the bloodcats in sector I16.
- After you eliminate all the bloodcats, Omerta's loyalty will increase.
Matt : Head miner of Alma.
- He is the brother of Greg "Dynamo" Duncan.
- Speak to him receive information about rescuing Dynamo from the Tixa prison in sector J9 .
- After you rescue Dynamo and he returns to talk to Matt, Omerta's loyalty will increase.
I13 La Alma
Tip(s) :
- Make sure you wear a fully functional Gas Mask (100% status) before going to attack this sector.
- Some doors are very difficult to open, even Trevor cannot pick them. You must either use a Shaped Charge explosive or unlock them with a keycard dropped by a dead soldier.
Enemies: ~30
- Items:
- 7.62x54mm 10 AP
- 7.62mm WP 30 HP
- 7.2mm NATO 20
- 5.56mm 100 AP
- V-94
- 40mm Grenade
- Tool Kit
- camouflage kit
- compound 18
- wire gutters
- energy boost
- hospital
- gas mask
- Porn
H13 La Alma
Tip(s):
- There are land mimes in room!
Enemies: ~25
Items:
- M16
- AKM
- USP
- 7.62*54mm 10 HP
- 7.62mm NATO 20
- 7.62mm WP 30 AP
- 5.56mm Mag
- 5.56mm Mag HP
- 9mm Mag AP
- Silencer for 9mm
- Mortar Shell
- 40mm Grenade
- Break Light
- Gas Mask
- Sun Goggles
- Hospital
- 1st Aid Kit
- Tool Kit
- Camo Kit
- Canteen
- Compound 18
- Remote Det.
- Porn
- Batteries
- Gum
- Marbles
- Key Card
- Padlock Key
Conrad : A trainer of the Queen's forces, a recruitable NPC, $3,300 per day.
General : A general of the Queen's army.
- He trains troops alongside Conrad Gillitt.
- Send a mercenary to speak with him to obtain information about La Orta in sector K4.
- Shoot him immediately after he mentions Orta K4, or you will be killed instead. Kill him will increase sector H13's loyalty.
- Items:
- H&K G3A3
- $90
H14 La Alma
This sector contains one of the greatest collections of valuable items and ammunition stashes in the game.
Enemies: ~30
Items (more than 180) :
- USP
- silencer for 9mm
- 7.62x54mm
- 4.6mm
- 5.56mm
- 7.62mm NATO
- Gas
- Mortar Shell x6
- LAW
- LAW Socket
- M79
- 40mm Grenade
- Stun Grenade
- Hand Grenade
- Mini Grenade
- Mustard grenade
- Ceramic Plates x4
- Camo Kit x4
- Extended Ear
- Night Goggles
- Compound 18
- Spectra Helmet
- Spectra Vest
- Spectra Pants
- Metal Detector *
- Remote Trigger
- Laser Scope
- Sniper Scope
- Bipod
La Cambria
Main facilities: hospital
H8 La Cambria Mine
Enemies: ~30
Carl : The head honcho of underground.
- After you gain control of sector D13 and sector's loyalty is higher than 30% (expert level), speak to him to begin receiving daily income from the mine.
Items
- LAW
- TNT
- C1
- HMX
- Detonator
- Remote Detonator
F9 La Cambria
Tip(s) :
- Be careful some enemies hide behind the door and civilian, or use civilian as shield.
Enemies: ~30
Items
- Pack of Gum
- Porn
- Glass Jar
- Quick Glue
F8 Cambria Hospital
Tip(s) :
- Do not take or steal anything from hospital or its repository.
Bob : TBD.
Jenny : A nurse.
Vince : A doctor, a recruitable NPC, $500 per day.
- Take control of 2 towns(5 towns if playing on expert difficulty) at least and wait to Cambria loyal is high enough, then return to recruit him.
Items:
- Battery
- Blood Knife
- 1st Aid Kit
- Hospital
G8 La Cambria
Enemies: ~30
Martha : A mother whose son Joey has run away from home.
- Speak to her and help her bring her son Joey from home from San Mona sector C5. Doing so will increase Cambria's loyalty.
- After Joey returns home, talk to Martha again. She will mention her husband's chief doctor Vince.
F8-1
Items:
- X-Ray Tube
- 1st Aid Kit
- Hospital
G9 La Cambria
Tip(s) :
- Do not pick locks or take items in front of NPCs and civilians, or they will become hostile toward you.
Enemies: ~30
Keith : A secondhand equipment deader.
- He will offer more items (include firearms) at the best prices once the Hicks family trouble in sector F10 is resolved.
- His daily trade limit is $3,000.
Rat (sci-fi) : A friend of Gabby.
- Sectors: G9
- He known a lot of information about Crepitus.
- Interesting: This game mod uses the voice of an actor from the 1972 film The Godfather actor voice for him.
Perko : A small repair business store owner.
- He could repair non-electronics items, such grenade, break light and goggles.
Items :
- Grenade
- HK 53
- Colt Commando
- Colt 1911
I8 Desert, SAM Site
Tip(s) :
- Bringing mercenaries with high MRK, Night Ops and Stealth skills, Smokes and Mortars/Sniper will greatly increase your chances of a successful attack.
- Be careful some enemies hide behind the door in the monitor room.
EL Tixa
Main facilities: prison
J9 EL Tixa
Enemies: 25~30
- recap: 12-20
Items:
- Gas Mask x19
- prison key
- shiny key
Brewster : Warden's husband, and if you talk to him, he will get the key to Warden's office backdoor.
Warden : Overseer of Tixa prison and must be killed.
- Items: colt commando, $50
Dynamo : A lock-picking expert, a recruitable NPC, $0 per day, and the brother of Alma I14 mine head Matt.
- You must heal him before recruitment.
- If you take Dynamo go Alma I14 to meet Matt, Matt will reward you a colt commando with silencer.
J9-1 Tixa Dungeon
Enemies: 6
Items:
- Prison Key
- Shiny Key
- Dart x5
- .45 MAG
- 9mm MAG AP
- Break Light x7
- Hospital
- 1st Aid Kit x2
- Tool Kit
- Compound 18
- Can
- String
- Beer
- Energy Boost
- Extended Ear
Items (kill and take from neutral militia) :
- SPAS-15
- Duckbill
- Sniper Scope
- Laser Scope
Items (sci-fi mode) :
- M4
- Jar of Elixir
- Jelly
Shank : A Throwing expert come from rich, a recruitable NPC, $20 per day.
- Shank can arrange for fuel if escorted to Estoni.
Gordon : He lost his mind after being tortured by the queen's experiments and soldiers.
J9-2 Tixa Dungeon (sci-fi mode)
TBD.
EL Balime
Tip(s) :
- Attack Balime only after visiting Yanni in Chitzena sector A2 and Kingpin in San Mona sector D5 to learn the history of the Chalice of Chance.
- Many doors in the homes of wealthy families are trapped. You must disarm the traps before attempting to pick the locks.
L11 EL Balime
Enemies: ~16
Items:
- SVU
- 7.62x54mm 10 AP x4
- Video Camera
- Portable TV
Armand : A wealthy man and Lora's husband.
- After repeated threats, he will donate money to support the rebel force.
Lora : Armand's wife.
L12 EL Balime
Enemies: ~16
- recap: ~6
Items: TBD.
Eldin : A museum security guard.
- Even though the Balime's loyal will drop to zero if you kill him, it is required to complete the quest.
Howard : A pharmaceuticals merchant.
- Open hours: 9:30 - 17:30
Sam : An item seller and proprietor of a hardware store.
- Open hours: 10:00 - 18:00
Franz : A electronics and other goods dealer.
- Open hours: 9:30 - 17:30
- His daily trade limit is $5,000.
La Chitzena
Associated mine: B2
A1 La Chitzena
Enemies: ~20
B2 La Chitzena
Oswald : The head miner of Chitzena.
- After you gain control of sector and sector's loyalty is higher than 30% (expert level), speak to him to begin receiving daily income from the mine.
B1 La Chitzena
Tip(s)
- There are many explosives in this sector. Avoid using explosives to prevent accidentally harming civilians.
Enemies: ~16
A2 La Chitzena
Enemies: ~23
Yanni : A guide and protector of the Chitzena temple.
- Speak to him to learn the history of Chalice of Chance.
- Retrieve the Chalice of Chance from Balime sector L12 and return it to Yanni. Doing so will greatly increase the loyalty of Chitzena and other towns.
Mary & John Kulba : An American couple and tourists.
- They planned to travel to Aruba but mistakenly ended up in Arulco. Frustrated, they blame each other and now want to return home safely as soon as possible. Escorting them to Drassen will be a big help.
- As thanks, they will give you $2,000 in cash and later mail you some firearms (include H&K MP7 PDW, 4.6mm magazine, and a silencer for the MP7) a few days after they return to the United States.
D2 Tropical, SAM Site
Tip(s) :
- Bringing mercenaries with high MRK, Heavy Weapons, Night Ops and Stealth skills, Smokes and Mortars will greatly increase your chances of a successful attack.
- Be careful some enemies hide behind the door in the monitor room.
Enemies: ~30
Items (more than 100 at Expert level) :
- MP7
- USP
- Micro UZI
- 4.6mm magazine x5 5.45mm x2
- 9*39mm x4
- 7.62mm mag. 30 AP x2
- 7.62mm NATO 20
- 7.62mm Magazine 100 x2
- Mortar Shell x2
- Hand Grenade x8
- Smoke Grenade x5
- Mini Grenade x3
- Hospital
- Camouflage Kit
- Energy Boost
- Gas
- Extended Ear
- Night Goggles
- TNT
- Spectra Pants x3
- Spectra Helmet x1
EL Grumm
H1 EL Grumm
Enemies: ~22
Fredo: The Electroni-Fix store owner.
- Location top-right corner
- Open at between 10:00 and 18:00
Arnold : The Iron Worx store owner.
- Location top-right corner
- Open at between 10:00 and 18:00
- He can repair non-electronic items in batch, such as helmet, vest, and 40mm Grenade.
Tina : A cloth store owner.
- Location top-left corner
- Do not take anything from her store, or the sector's loyalty will decrease.
G1 EL Grumm
Enemies: ~22
G2 EL Grumm
One of arms and equipment depots.
Tip(s) :
- You can't enter sector G2 directly from G3, try the path G3 → H3 → H2 → G2 instead.
- The best attack point is the house opposite the main gate.
- First eliminate the enemies around and on top of the entrance guard room, then climb onto the guard room itself and clear out any remaining enemies within your line of sight.
Enemies: ~22
Items: novice ~90
- M14
- Mor
- Calico M950
- M870
- MP5K
- 7.62mm NATO 20 x6
- 5.56mm Mag x2
- 12 Gauge BS
- .45 Mag
- 9mm Mag AP
- LAW Rocket
- Mortar Shell x2
- 40mm Grenade x8
- Mustard Gas x2
- Hand Grenade x8
- Mini Grenade x3
- Stun Grenade x4
- Tear Gas x4
- Smoke Grenade x5
- Laser Scope
- Bipod x2
- Break Light x8
- Knife
- Throw. Knife
- Crowbar
- Ceramic Plates
- Flake Jacket
- Steel Helmet
- T. Guard Vest
- UV Goggles
- Night Goggles
- Sun Goggles
- Gas Mask
- Tool Kit
- Camo Kit
- Locksmith Kit
- Canteen x8
- Compound 18
Items: expert ~120, We only list Items: here that differ from the novice level
- G3
- Extended Ear
- 7.62mm WP 30 AP x3
- 5.56mm Mag HP x5
- 5.45mm Mag x3
H2 EL Grumm
Enemies: ~30
Items:
- G3
- Uzi
- M870
- 5.56mm Magazine x11
- 7.62mm NATO 20 x5
- Mortar Shell x2
- Stun Grenade x3
- Mini grenade x3
- Stun grenade x3
- Silencer for 9mm
- Bipod
- Compound 18
Druggist : Sammy "Charlie" Elgin, One of 6 terrorists.
- Items:
- AKM
- 7.62mm WP Magazine 30 AP x2
- $2,110
- Alcohol x4
- Wine x3
- Beer x14
Manny : A bar owner and one of the five Santos Brothers.
- Location lower-left corner
Items (more than 80) :
- G3
- Uzi
- M870
- 5.56mm magazine x11
- 7.62mm NATO 20 x5
- Mortar Shell x2
- Stun Grenade x3
- Mini Grenade x3
- Silencer for 9mm
- Compound 18
- Bipod
H3 EL Grumm Mine
Enemies: ~20
Items:
- C1
- C4
- HMX
Calvin : The head miner of Grumm.
- Location lower-right corner
- After you gain control of sector and sector's loyalty is higher than 30% (expert level), speak to him to begin receiving daily income from the mine.
La Orta
K4 La Orta
Tip(s) :
- The best attack point is the house opposite the main gate. First, eliminate the enemies around and on top of the entrance guard room. Then approach the guard room from the right side Swamp, climb onto it, and clear out any remaining enemies within your line of sight.
- Move through the swamp with a Metal Detector; it will automatically indicate land mines.
- Make sure you wear a fully functional Gas Mask (100% status) before going into the basement.
Enemies: 15-30
- recap: ~15
Items:
- Colt Commando
- MP5
- M4
- AK-74
- AKM
- M79
- 5.56mm Magazine
- 5.56mm Magazine HP
- Hand Grenade
- Mini Grenade
- 40mm Stun
- Extended Ear
- Gas Mask
- Sun Goggles
- X-Ray Tube
- Copper Wire
- String
- Can
- Compound 18
- Wine, Beer
- Camo Kit
- Break Light
- Canteen
- Crowbar
- Hospital
- 1st Aid Kit
- Key
- $983
K4-1 Orta Basement
Tip(s) :
- Some doors are very difficult to open, even Trevor cannot pick them. You must either use a Shaped Charge explosive or unlock them with a keycard dropped by a dead soldier.
Enemies: 15-30
Items:
- VAL *
- 9x39mm 20
- V-94
- 12.7mm AP
- 12.7mm HE
- 12.7mm HEAP
- MP7
- 4.6mm Magazine
- P90
- 5.7mm Magazine HP
- Micro Uzi
- 9mm Magazine AP
- LAW
- LAW Rocket
- Mortar Shell
- 5.45mm Magazine
- 7.62x54mm 10 AP
- 5.56mm 100 AP
- 7.62mm WP 75 AP
- Guardian Vest
- Metal Detector *
- Canteen, Tool Kit
Items (drop from dead soldiers):
- FN-FAL
- VSS
- Keycard
La Meduna
Main facilities: airport
Tip(s) :
- NOTICE: Attacking any of the sectors M2, M3, M4, M5, N6 or Meduna sectors will cause NPCs in San Mona (such as Tony in C5) to become hostile.
- Enemies will only deploy tanks but no soldier after they recapture sector.
- Try the path M3 → M3-1 → M4-1 → N4-1 → O4-1 → O4, if you wish to kill the queen as soon as possible.
N6 Tropical, road
Enemies: ~30
- recap: ~22
Tanks: 4
Items (Expert):
- $6,488
N7 Coastal, road
Enemies: ~24
- recap: ~8
Items (more than 80 at Expert level):
- LAW rocket x 8
- Shell mortar x 9
- 40 mm grenade x4
- smoke grenade x9
- 7.62mm x 54mm 10 AP x6
- 9x39mm magazine
- break light x3
- watch
- hospital
- gum, energy booster x4
- compound 18
- silencer for 9mm
- ceramic plastic x2
Items (recap, dropped from daed solider):
- G36E
M5 Forest, road
Enemies: ~30
Tanks: 3
Items (Expert):
- RPK
- G3
- M14
- V-94
- 7.62mm WS 75 AP x2
- 7.62mm NATO x2
- hand grenade x3
- mini grenade x2
- mortar shell x2
- LAW rocket
- locksmith kit
- camouflage kit
Items (dropped from dead solider):
- SVD
M4 Urban
You can access sector M4-1 from the house in the center.
Enemies: ~30
Tanks: 5
M3 Urban
Enemies: ~30
Tanks: 4
O3 La Meduna
Enemies: ~18
Tanks: 3
N3 Meduna Airport
Enemies: ~30
Tanks: 6
N4 Meduna, SAM Site
Tip(s) :
- Try the path M4-1 → N4-1 → N4, it is much easier than to enter directly from the ground.
Enemies: ~20
Tanks: 4
N5 La Meduna
Enemies: ~30
Tanks: 3
Bloodcats: ~8
O3-1 Tunnel Spoiler
Enemies: ~18
Tip(s) :
- No entrance to this sector can be found via the sewers or O3; entry is only possible from P3‑1 (possibly a bug).
- The enemies here are equipped with valuable weaponry, such as LAW or V‑94.
Items: expert
- G36 x3
- FN Minimi
- HK 53 x2
- LAW x3
- CAWS x2
- SVU
- Batteries
- Steel Tube
- Wire Cutter
- Locksmith Kit
- 1st Aid Kit x2
O4 La Meduna
Enemies: ~20
Tanks: 3
O4-1 Sewer
You can go to sector O4 Residential from here.
P3 La Meduna
Enemies: ~30
Tanks: 1
Tip(s) : In the center of the map, there is a piano room with a fireplace, that serves as a hidden entrance to P3-1 Shelter.
Elliot : The queen's advisor, he has no firearm and will not attack you.
P3-1 Shelter
Tip(s) :
- Make sure you wear 100% status Gas Mask before go to basement.
- You must either use a Shaped Charge explosive or hire Trevor to pick the door to the Queen's room. Each door requires at least three Shaped Charges.
Deidranna : The queen.
- Killing her will end the game, no matter how many enemies are still alive.
Bloodcat
Sectors where bloodcat might be encountered
- K14 Woods, road
- F7 Mountain, road
- E13 Water
- J6 Woods, road
- F12 Woods, road
- I16 Forest
Crepitus (sci-fi)
Tip(s)
- You can get close to Crepitus if wrap yourself with Jar of Elixir.
- Buy Jar of Elixir from Gabby.
Varieties
larvae: They cannot attack and only move slowly. Use them to practice punching (make sure the adults are not close by).
teen: They are in small white, smaller than adults, crawl slower then adult.
adult male: They are in large, dark green and fast, mostly do ranged attack, a green poison gas that will kill your merc in 1 or 2 rounds if they succeed.
adult female: These are the toughest of the Crepitus. They are as same size as male but faster, mostly attack in melee but will do ranged sometime.
queen: The largest Crepitus, only found once in third level sublevel. She cannot move but her attack is devastating most likely instantly kill, also have an extremely high amount of HP.
- You need to kill her in order to complete the quest and restore the mine production.
Related sectors:
- H8
- H8-1 H9-1
- H8-2 H9-2 Creature Lair
- H8-3 I8-3 J8-3
- J8-3 Creature Lair
Important Sectors
M2 Urban
Tip(s) :
- Do not use any explosives in this sector, as it is easy to accidentally harm civilians.
- There are many heavy weapons ammunition supplies store in the repositories.
- You can access the M2-1 Sewer from here, which is connect to the M3-1 Sewer.
M2-1 Sewer
Tip(s) :
- You can access the M3-1 Sewer from here.
- Most of enemy solders carry valuable gear, such as H&K MSG90.
F10 Farm, road
Tip(s)
- The Hicks family armed forces control this sector, and you must eliminate all of them.
- Your mercenaries can punch cows to increase their STR and DEX attributes.
- You can acquire many shotguns here and sell them to Keith in sector G9 or Tony in sector C5 for a better price.
Enemies: ~20
Daryl & Darrel : Brothers from the Hicks family.
I11 Plains, road
MadLab : A scientist who betrayed the Queen and went into hiding.
- Speak to him get a lethal combat Robot.
Robot : A remote-control combat robot.
L10 Woods, road
Dave : A Vehicle dealer.
- He offers to sell a Hummer for $10,000, plus occasional free gas fill-ups.
G3 Coastal, road
Enemies: 8-21
- recap: 6 (novice)
Items (more than 60):
- MAC-10
- 12 Gauge
- 12 Gauge BS
- .357 Mag AP
- .45 SMG Mag
- .45 SMG Mag AP
- .45 SMG Mag HP
- .45 SMG Mag
- 9mm SMG Mag AP
- 9mm Mag AP
- 9mm Mag HP
- Hand Grenade
- Mini Grenade
- Stun Grenade
- Mortar Shell x2
- Knife
- Hospital
- Camo Kit x2
- Laser Scope
- Compound 18
J12 Forest road
Tip(s) :
- This sector contains one of the greatest collections of valuable items and ammunition stashes in the game.
Enemies: ~13
Items (more than 200):
- AN-94 x2
- HK 21
- Mortar
- Mortar Shell x4
- LAW
- 7.62x54mm 10 HP x4
- 9x39mm 20 x4
- 9x39mm 10 x8
- 7.62mm WP. 75 AP x5
- 7.62mm WP. 30 AP x9
- 7.62mm WP. 30 HP x4
- 7.62mm NATO Box. 100 x2
- 7.62mm NATO Box. 100 HP
- 7.62mm NATO Magazine, 20 x12
- 7.62mm NATO 20 Magazine, 20 HP x6
- 5.45mm Magazine x16
- 4.6mm Magazine x8
- 9mm Magazine AP 50
- M79
- 40mm Grenade x16
- Talon x2
- Laser Scope x2
- Hand Grenade x24
- Mini Grenade x35
- Stun Grenade x16
- Spectra Pants x2
- Spectra Vest x2
- Spectra Helmet x2
- Ceramic Plates x4
- Extended Ear
- Sun Goggles
- UV Goggles
- Hospital
- 1st Aid Kit x4
- Canteen x3
- Tool Kit
- Locksmith Kit
- Break Light
- Camouflage Kit x4
- Compound 18 x4
L2 Coastal, road
Enemies: ~30
- recap: ~22
Items (more than 80 at Expert level):
- G3
- V-94
- MSG90
- SVU
- M79
- FN Minimi
- RPK
- 7.62*54mm 10 AP
- 12.7mm, AP
- 7.62mm WP Drum, 75 AP
- 7.62mm WP Drum, 75 HP
- 7.62mm NATO Box 100 AP
- 7.62mm NATO Box 100 HP
- 5.56mm 100 AP
- Mustard Gas
- Tear Gas
- Smoke Grenade
- Machete
- Break Light
- Extended Ear
- Spectra Helmet
- Locksmith Kit
- Canteen
- Gum
B6 Farm, road
Items (Expert):
- hand grenade x40
H4 Forest, road
Enemies: ~20
Items (Expert):
- Colt Commando
- 7.62x54mm 10 AP
- 7.62mm NATO 20 x4
- 5.56mm HP x2
- 5.56mm
- stun grenade
- smoke grenade
- spectra vest
- spectra helmet
- batteries
Avoid Sectors
- M7 Woods
- Fighting in the woods is difficult, even if you deploy your best mercenaries with Night Ops skills and valuable gear.
- M10 Tropical, road
Road Types
Type | Sector
Coastal, road : N8 G3
Desert : I8 L8
Desert, road : J8 K8
Farm, road : B8 E8
Hills : A8 F6
Impassable : P9 O10
Forest : M8 K15
Forest, road: J12 E15
Mountain, road : E5
Plains : L9 D10
Plains, road : C9 B9
Swamp : E10 B15
Tropical : C1 Tropical, road : O8 M10
Sewer : O4-1
Urban : N9 O9
Woods : C10
Woods, road : C8 M9