JA2 Walkthrough - San Mona
C6 San Mona - Town
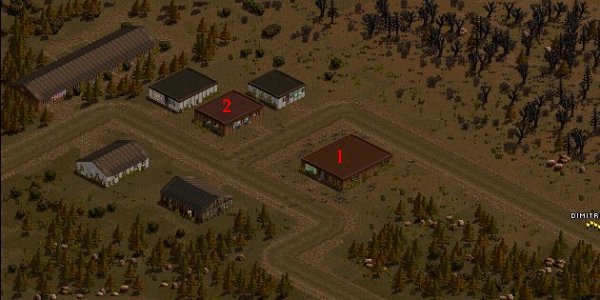
- Bar
- Angel's Shop
Here, you only need to complete the Maria quest:
Talk to Angel with a merc with high leadership. Decline the leather jacket he offers (you get it as a gift after completion). The task: Retrieve his sister Maria from the Shady Lady brothel (C5).
Easiest way: Go to the back door of Shady Lady and have someone with high experience disarm the door siren. Then someone picks the locks, and you're in. Maria is behind the first door on the left and joins immediately. Now carefully sneak out with Maria in hand without being seen and return to Angel.
Alternative method (thx to Flashy): Go to the brothel with any merc, have the ladies explained, pick one and pay. The doorman clears the way. In the hall, a guard comes out of the first office on the left—let him pass. Key on the desk in the office—pocket it.
Now boost morale by visiting the chosen lady (not our target). After gymnastics, visit sis, talk to her, and slip out the back door with the key, quickly leave the sector, and back to Angel.
As thanks, he tells you where KingPin's money is hidden and hands you a document and the leather jacket. The document is the deed to Angel's shop. Since you didn't come to Arulco as a leather jacket dealer but to smoke out Deidranna, take this document to Kyle Lemmons' tattoo shop in C5 and hand it over. He gives you 10,000 dollars. KingPin's money is deep in the abandoned gold mine. But don't go get it yet—it'll be useful later.
In the bar, you often meet Mikey O'Brien, the fur trader.
C5 San Mona - Town
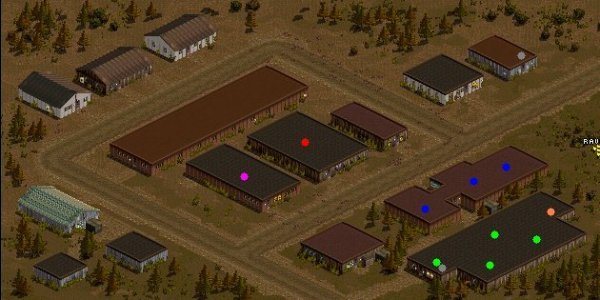
- (red) Tony the gun dealer
- (blue) Local bar, possible hangout for Carmen
- (pink) Kyle Lemmons' tattoo shop
- (yellow) Maria is here
- (gray) Video for Tony's doorman may be here
- (green) Shady Lady, more guards possible
To reach gun dealer Tony, first go to the big house in the sector center (red dot) and talk to Hans, the shop owner. But he's too annoyed by the woman with subtle makeup to focus, so get her wish video. Simply enter Shady Lady or search northeast houses. Back to Hans, hand the woman the video—she leaves, and you can talk undisturbed.
He lets you into the back room to Tony shortly after, and happy gun buying/selling begins.
Tony gets new weapons and ammo daily, so check back next day if something's missing.
Unfortunately, Hans might say Tony's out for a day... and next day... and next... To prevent reliably, station a merc to babysit Tony and check daily—e.g., Shank or Hamous finds life's purpose...
Also the Maria quest here. (Repeated from C6.)
As thanks... (Repeated reward.)
In the bar, you might find bounty hunter Carmen, explosives dealer Devin, and merc Iggy.
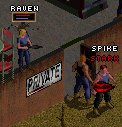
D5 San Mona - Boxing Ring
A district set up just for KingPin's crew.
Here, you can box for some cash.

First, ask Spike—he only lets select people in, like a pretty lady with a nice AKM ready...
To box, talk to the owner—he asks how much to bet. You're confident, bet full $5000. Once someone enters the ring, fight starts. Boost odds with not-quite-PC actions: Brass knuckles don't count as weapon, tear gas in ring works well. But mining opponent's corner is kinda unfair...
Further south, narrow almost tiny house with lots of people. Save here at latest.
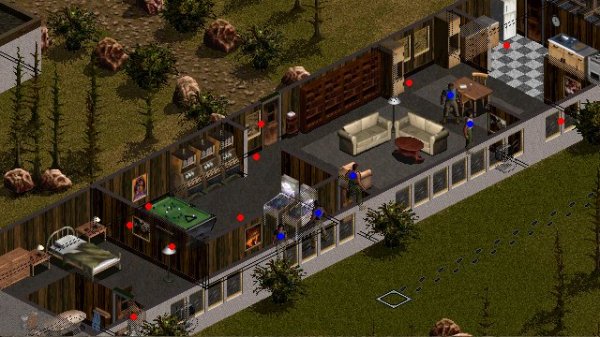
- (red) Enemies
- (blue) Possible positions
If you've won the boxing match successfully, KingPin invites you to his house (southeast). There, he offers an interesting deal for a small "errand": Fetch the Goblet of Glory from Balime museum (reward: $10,000). But Yanni in Chitzena wants it too (reward: nationwide loyalty boost). Options:
You're a model merc, ignore KingPin, get goblet, deliver to Yanni
You're a money-grubbing sack, return to KingPin
You're a murder-hungry wannabe-Rambo, grin dumbly at KingPin post-speech, then plant him and gang 1m deeper (like all others so far), move on
You're clever: Give KingPin goblet, pocket cash, blow his head off as thanks, then innocently smile delivering to Yanni
You hate violence, skip museum break-in on principle, move on
Proven: "Oops-dropped-mustard-gas-grenade" tactic—no one notices (bodyguards stand dumb), loot safely