JA2 Walkthrough - Grumm
H3 Grumm – Mine
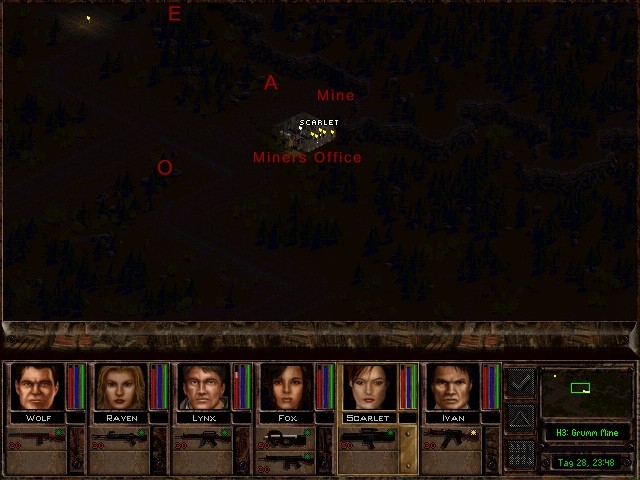
Plan:
The camouflaged team enters the sector from the north (Position E) after nightfall and silently advances through the forest to the Miners' Office, where a secure fallback position is to be established. Afterwards, the sector will be cleared of remaining enemies.
Execution:
The team—Scarlet (AE), Wolf, Fox, Lynx, Ivan, and Raven—boards the van in disguise and drives into the sector from the north. Upon arrival (Position E), they crouch and move in stealth mode, loosely spread out, using trees and rocks for cover as they head southeast. Seconds later, the first enemy appears; Scarlet dispatches him with a throwing knife. However, the enemy notices the team before dying, preventing a return to real-time mode.
Tactical Change:
Resistance will now be ended by all available means.
Over the next three rounds, 11 enemies approach from the south and southeast but are eliminated with precise headshots before posing a threat. In round 4, one enemy attacks from the west, lightly injuring Lynx before being killed by Fox, who then treats Lynx while Raven provides cover. I realize my mistake: I had assigned Lynx, the least experienced mercenary (level 4), to guard the critical right flank. Fox takes over that position. The team advances to the forest edge without further contact.
Second Tactical Change:
Since most enemies are already dead, I skip establishing the fallback point. The team splits:
- Omega Squad (Scarlet, Ivan, Raven) moves west.
- Alpha Squad (Wolf, Fox, Lynx) moves south.
Lynx spots two enemies behind a house (Position A), kills one, and Fox eliminates the other out of sight. In the next round, Fox and Wolf advance; Fox interrupts an enemy scavenging gear from fallen comrades and kills him. Meanwhile, Omega Squad hears movement from the south. Scarlet detects the enemy and kills him with two headshots (Position O). This is the last foe in the sector.
The obligatory conversation with the mine foreman follows, after which his cabinets are searched and the mine looted. Before leaving for the next sector, Wolf crafts a barrel extension from scavenged parts.
H2 Grumm – Factory
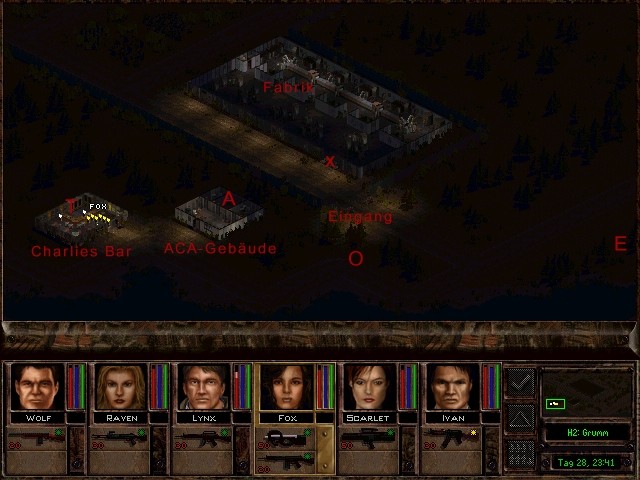
Plan:
The team enters from the east (Position E) and sneaks west toward the ACA building. South of the factory entrance, the team splits:
- Alpha Squad (Raven, Fox, Lynx) secures the ACA building, eliminates guards, and takes rooftop position (Position A).
- Omega Squad (Scarlet, Wolf, Ivan) watches the factory entrance (Position O) and eliminates any enemies rushing out.
While Alpha controls the forecourt, Omega blasts a hole in the southwest factory wall (Position X) and clears the guards.
Execution:
Everything proceeds as planned. Alpha kills two guards at the ACA building and takes position. The noise draws two soldiers into Omega's line of fire (Position O). On the roof, Alpha eliminates five confused soldiers in the forecourt. Omega then detonates HMX to breach the wall (Position X), killing one unlucky soldier. Ivan finishes him off, and Scarlet leads the team deeper into the building. Using Scarlet's UV goggles and superior experience, the remaining four enemies are hunted and killed before they can react.
The factory crates are looted, booby-trapped items behind the conveyor belt defused, ACA cabinets searched, and finally the terrorist "The Druggist"—disguised as bartender Charlie—is executed and decapitated (Position T). Charlie's Bar is one of the daytime locations where explosives dealer Devin can be found.
H1 Grumm – Business and Residential District
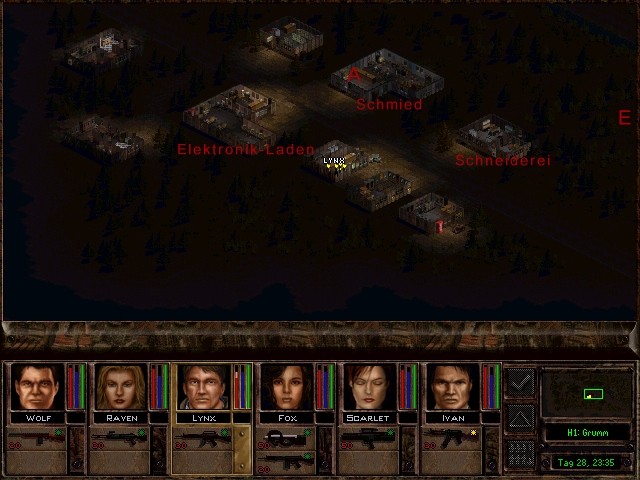
Plan:
The team enters from the east (Position E) and sneaks northwest toward the blacksmith's workshop. They split:
- Alpha Squad (Raven, Lynx, Ivan) secures a fallback position on the roof (Position A).
- Omega Squad (Scarlet, Wolf, Fox) circles the buildings in a U-shaped path, silently eliminating enemies with suppressed SMGs, throwing knives, and combat blades.
Execution:
Immediately upon entry (Position E), the team encounters and eliminates a guard with a knife throw. Seconds later, another enemy is silently dispatched. Between the tailor's shop and the smithy, three more foes are killed using throwing knives and Fox's suppressed FN-P90 burst. As planned, Alpha takes rooftop position (Position A) while Omega clears the path, eliminating the remaining seven enemies.
Finally, the buildings and crates near the smithy are searched. The electronics shop and smithy are looted—only at night, since being caught stealing prevents access to their services (weapon repair, electronics repair, and rocket launcher fingerprint-ID removal).
G1 Grumm – Residential District
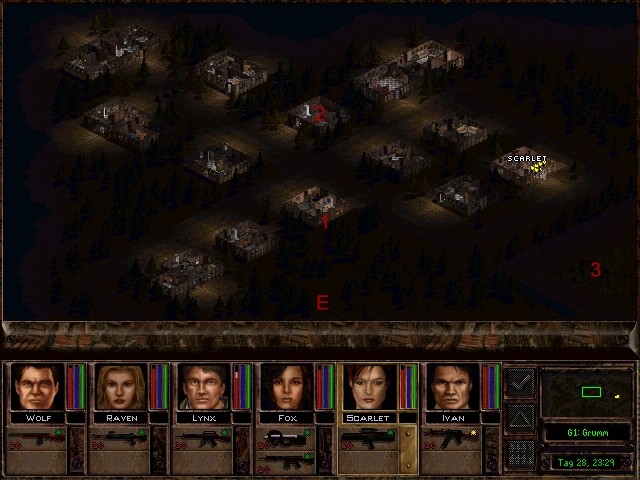
Plan:
The team enters from the south (Position E) and systematically checks each house for enemies, eliminating them as quietly as possible.
Execution:
Moving house to house, the team encounters an enemy in the third building. Lynx kills him with two headshots while the rest take cover (Position 1). Eight more soldiers make the fatal mistake of stepping out from cover and are eliminated. The team continues searching, encountering six more foes: one barricaded in a locked house north of the intersection (Position 2)—best breached by blasting the northeast wall if the team is low-level—and another hiding among crates behind a fence (Position 3). Afterwards, all crates and buildings are searched for useful items.
G2 Grumm – Factory
Plan:
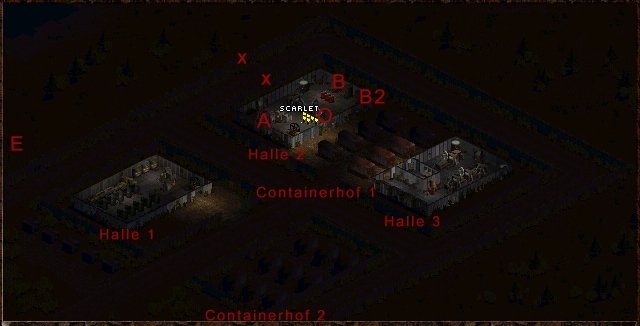
The team enters from the west (Position E), sneaks northeast behind the factory buildings (Hall 2), and cuts through two fences (Position X). They climb onto the roof and split:
- Alpha Squad (Raven, Lynx) takes the southwest edge (Position A).
- Beta Squad (Ivan, Wolf) takes the northeast edge (Position B).
- Omega Squad (Scarlet, Fox) takes the southeast edge (Position O).
All visible enemies are engaged. If none remain, Beta advances to the eastern corner (Position B2) while Omega clears remaining guards.
Execution:
Initially, all goes to plan. Wolf encounters a guard while cutting the second fence (Position X), but Scarlet eliminates him silently. The team reaches Hall 2. Scarlet climbs the roof, another soldier appears, and Fox kills him with her suppressed FN-P90. Unfortunately, the third shot ricochets, alerting the guards prematurely. Despite this, the team secures rooftop positions (A, B, O). Over the next rounds, 12 guards are eliminated: Omega kills 5, Alpha 3, Beta 4. Scarlet later patrols the roof perimeter and kills another soldier. Omega searches Container Yard 1, eliminating two more guards. Inspection of Halls 2 and 3 reveals no further enemies. The squad then moves south to Container Yard 2, where the last foe is eliminated. Buildings and crates are searched, and booby-trapped equipment behind the conveyor belt in Hall 2 is defused before militia training begins.
Congratulations!
You are now the proud owner of a complete industrial city.